Latest News
27.11.2024

Shot Peening of S30432 Austenitic Stainless Steel Boiler Tubes

High-temperature oxidation and corrosion of the inner wall are among the main factors causing the failure of supercritical power station boiler tubes. To extend the service life of boiler tubes and meet...
Follow
Follow us listed below websites to get updated information of Landee Pipe.
Contact
Tel: 86-592-5204188
Fax: 86-592-5204189
[email protected]
Industry News
Applications of Fully Automatic Ultrasonic Inspection to Welding Seams of Carbon Steel Pipelines (Part Two)
Posted: 10/27/2021 13:29:41  Hits: 22
3. Scanning tests of welding seams
(1) Calibration of AUT systems: The adjusted AUT scanning device was plated on the calibration  block to calibrate one by one in accordance with the simulated focus law to ensure that the amplitude of the strip scan signal of each channel was between 70% and 99% in the dynamic calibration.
(2) Scanning of AUT welding seams: After the calibration was done, 5 artificially defective welding seams on a pipe with a diameter of 114.3 mm would be scanned one by one.
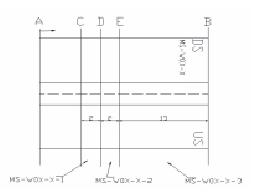
(3) Reference line drawing: Placed the AUT scanning device at the defect of the welding seam. Walked back and forth to find the highest wave position of the defect, and marked the highest wave position of the defect and travel direction of the AUT scanner with a marker; drew a reference line for the defect location. The reference line drawing is as shown in Figure 6.
 
 
Figure 6 The schematic diagram of the defect reference line
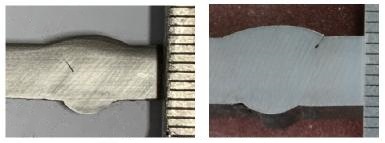
(4) Macro slicing: According to the defect reference line, 25 artificial defects detected by AUT were cut one by one, and the relevant defect slices were shown in Figure 7.
 
Figure 7 Slicing of related defects
 
4. Comparative analysis of data
Performed data analysis on the AUT scan map of 5 artificial defected welding seams one by one, and recorded the relevant starting point, length, height, depth, type and other parameters of the defect one by one. Compared and analyzed with the macro slicing data. Comparative analysis of AUT and macro slice data is shown in Table 2. It can be seen from Table 2 above that for the 5 artificial defected welding seams numbered W01, W02, W03, W04 and W05, there was a deviation between -1 mm and 0.8 mm for the defect height value evaluated by AUT and macro slicing evaluation. The minimum deviation value was 0.1 mm, and the maximum deviation value was 1 mm.
 
Table 2 Comparative analysis of AUT and macro slicing data
Welding items  Wall thickness Defected items  Locations AUT data Slice data Height
Defected types Starting point Length Height Depth US/ Height Depth  
W01 6.4 1 The cover surface Lack of fusion  20  13 0.9  1 DS 0.7  1.2 0.2
W01 6.4 2 The cover surface Lack of fusion 93 15 0.7 1 US 0.8 1.1 -0.1
W01 6.4 3 The cover surface Lack of fusion 171
 
10
 
0.9
 
1
 
DS
 
1.1 2 -0.2
W01 6.4 4 The filling Lack of fusion 236 23 2.9 4.2 US 2.2 3.6 0.7
W01 6.4 5 The filling Lack of fusion 313 22 2.3 2.5 DS 2 3 0.3
W02 6.4 1 The filling Lack of fusion 16
 
23 2.8 4 DS 2 3.4 0.8
W02 6.4 2 The root Lack of fusion 95
 
13  1 6 C 1.3  6 -0.3
W02 6.4 3 The root Lack of fusion 164
 
18 0.5 6 C 1.5 6  -1
W02 6.4 4 The root Lack of fusion 241
 
16
 
0.5 6 C 1.2 6 -0.7
W02 6.4 5 The middle of the welding seam Lack of fusion between layers 312
 
21 1.8 4.1 C/V 2.2 4.2 NA
W03 6.4 1 The middle of the welding seam Lack of fusion between layers 23
 
7
 
0.9
 
4.2 C/V 2.9 4.2 NA
W03 6.4 2 The middle of the welding seam Gas holes between layers  100
 
 5 0.8 4.2 C/V 2.8 4.3 NA
W03 6.4 3 The cover surface Lack of fusion 162
 
23
 
1.3 1.3 DS 0.9 1.4 0.4
W03 6.4 4 The cover surface Lack of fusion 264
 
12
 
1.5 1.5 US 0.7 1.2 0.8
W03 6.4 5 The cover surface Lack of fusion 371
 
13 1.2 1.2 D/S 0.9 1.3 0.3
W04 6.4 1 The filling Lack of fusion 16
 
22
 
2.1
 
2.5
 
D/S 1.9 3.3 0.2
W04 6.4 2 The filling Lack of fusion 92
 
17
 
2.5
 
4.2 US 1.8 3.9 0.7
W04 6.4 3 The filling Lack of fusion 160
 
21
 
1.7
 
2.5 D/S 1.4 3.2 0.3
W04 6.4 4 The root Lack of fusion 239
 
17
 
1
 
6
 
C 1.4 6 -0.4
W04 6.4 5 The root Lack of fusion 315
 
14
 
0.7  6 C 1.2 6 -0.5
W05 6.4 1 The root Lack of fusion 22
 
17
 
0.5
 
6
 
C 1.4 6 -0.9
W05 6.4 2 The middle of the welding seam Lack of fusion between layers  92
 
21
 
1.5
 
4.8
 
C/V
 
1.9
 
4.1 NA
W05 6.4 3 The middle of the welding seam Dense gas holes 173
 
12 1.5 5 C/V 1.3 4.0 NA
W05 6.4 4 The middle of the welding seam Dense gas holes 236
 
16 1.1 4.4 C/V 1.4 4.2 NA
W05 6.4 5 The root Lack of welding 313
 
17
 
0.6 6 C 1.3 6 -0.7
  
5. Conclusion
According to the requirements of relevant standards for inspecting carbon steel pipelines, the defect height and quantitative accuracy of AUT detection process does not exceed ±1 mm. In the experiment, AUT inspection, data analysis, and reference line drawing were carried out one by one for artificial defect welds of the processed 5 pipes with a diameter of 114.3 mm (4 inches) and a wall thickness of 6.4 mm in this article, and then the 25 artificial defects were subjected to a macroscopic slice test one by one. Through data analysis, AUT detection technology could effectively detect 25 artificial defects processed in a welding seam on thin-walled pipe with a diameter of 114.3 mm (4 inches) and a wall thickness of 6.4 mm, and the greatest quantitative deviation of the height of the defect was 1 mm, which met the requirement for the defect height quantitative accuracy required by the carbon steel pipeline's inspection standard (±1 mm). Therefore, the AUT detection technology can be applied to inspecting the thin-walled carbon steel pipeline of 4 inches.


Post URL: https://www.landeepipe.com/applications-of-fully-automatic-ultrasonic-inspection-to-welding-seams-of-carbon-steel-pipelines-part-two.html
Landee Pipe is a professional industrial pipe manufacturer based in China, we have been producing pipe for a variety of applications, and covering areas of pipe manufacturing, exporting and trading. welcome to access our website: https://www.landeepipe.com.


Nickname*:
E-mail*:
Rate*:
Comments*:
About the author
Teresa
Teresa
Teresa is a skilled author specializing in industrial technical articles with over eight years of experience. She has a deep understanding of manufacturing processes, material science, and technological advancements. Her work includes detailed analyses, process optimization techniques, and quality control methods that aim to enhance production efficiency and product quality across various industries. Teresa's articles are well-researched, clear, and informative, making complex industrial concepts accessible to professionals and stakeholders.