Introduction
As the most complex industrial system, the thermal power boiler system has many pipes or components that are subject to high temperatures and pressures, and the types and forms of component failure are also diverse. The most common among them are failures of the four
tubes of the boiler such as water walls, economizers, superheater heaters and reheaters. Failures of the four tubes often occur during the start or operation of the boiler, which will cause the unit to stop and directly affect the economic benefits of the power plant. However, the four tubes of the boiler are located inside the furnace, which poses a relatively small threat to the personal safety of power station workers. However, the rupture of the steam and water pipes outside the furnace will seriously threaten human safety. Therefore, it is of great significance to the economic and social benefits of the power plant to accurately identify the rupture of the pipe outside the furnace and take certain preventive measures.
A 600MW coal-fired generator set is a condensing steam turbine generator set with a boiler model of HG-2028/17.4-YM7, primary reheat, wall-type tangential combustion, balanced ventilation, solid slag discharge, all-steel frame, and full suspension. During the operation of the unit, the reducer behind the regulating valve of the superheated steam first-level desuperheating jellyfish pipe on side A of the turbine room ruptured. The sound was loud at the scene. Fortunately, no staff were present and no personnel was injured. The reducer is made from 20G. The operating temperature is 183.5°C; the operating pressure is 23MPa, and the design wall thickness is 11mm. By the time the pipe ruptured, it had been used for approximately 100,000 hours. The schematic structural diagram of the location of the ruptured reducer is shown in Figure 1. The reasons for the rupture of the reducer were analyzed by physical and chemical tests on samples of broken reducers.

Figure 1 The structure of the ruptured reducers and the location of the rupture point
1.
Physical and chemical inspection
1.1
Macroscopic inspection
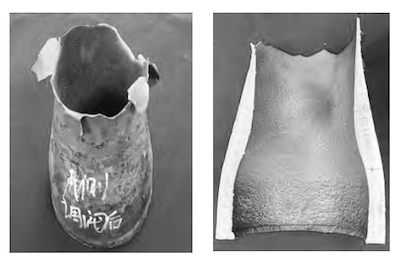
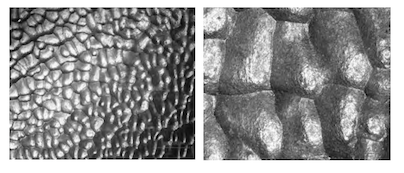
Figure 2 is a macro photo of the whole and longitudinal section of the broken reducer. There is obvious plastic deformation at the breaking part, and the wall thickness at the edge of the breaking part is seriously thinned. The measured thickness is 1.8 to 2.0mm. The measured wall thickness at the big end is 11.2 to 11.6mm, which is close to the designed wall thickness of 11.0mm. An integrated microscope was used to observe the inner wall near the breaking part, as shown in Figure 3. Densely packed small horseshoe-shaped pits appear at the inner wall, and no pitting corrosion, microcracks or other abnormalities were found.

Figure 2 Macroscopic morphology of the inner wall as a whole and after sectioning

Figure 3 Morphology of the inner wall under an integrated microscope
1.2
Analyzing chemical composition
Table 1 shows the analysis results of chemical composition of the broken reducer. The table also lists the requirements for the chemical composition of the procurement standard GB 5310-2008 for 20G steel. The results show that the chemical composition of the broken reducers meets the above standard requirements.
1.3
Hardness tests
GB 5310-2008 stipulates that the tensile strength of 20G ranges from 410 to 550MPa, but does not specify its hardness value. However, tensile specimens cannot be taken due to the limitation of the size of the reducers.
Only the hardness test is carried out on samples of the reducers, and the hardness test is carried out according to the standard. GB/T 33362-2016 "Conversion of Hardness Values of Metal Materials" converts hardness values into tensile strength values. The hardness test results and converted tensile strength values are shown in Table 2. During the hardness test, samples were taken from the area near the breaking mouth but without obvious plastic deformation, and from the big end far away from the breaking mouth. The results show that the tensile strength value converted from hardness meets the requirements of the GB 5310-2008 standard.
Table 1 Analysis results and standard requirements of chemical composition (w%)
1.4
Metallographic inspection
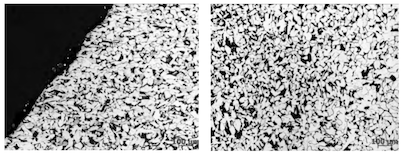
Samples were taken near the breaking mouth and at the big end for metallographic inspection, as shown in Figure 4. The grains at the edge of the breaking mouth have slight plastic deformation, and the cross-section shows a transgranular fracture. The microstructure near the fracture and at the big end is ferrite plus pearlite. The average grain size is about 7 levels, which is a normal microstructure of 20G.

(a) Breaking mouth edges (b) Big ends
Figure 4 Metallographic structure morphology sampled from different locations
1.5
Microscopic analysis of fracture surfaces
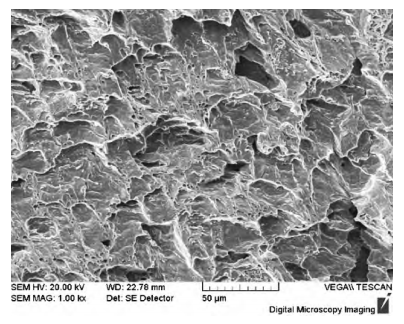
Samples were taken from the fracture positions of the reducers, and the fracture sections were observed under a scanning electron microscope. The electron microscopic morphology (SEM) is shown in Figure 5. The fracture section shows a microscopic tensile dimple morphology, which is typical ductile tearing.

Figure 5 SEM micromorphology of fracture
1.6
Analyzing energy spectrum
Through macroscopic inspection, it can be seen that the wall thickness of the reducers has been significantly thinned, and the thinned surface is the inner wall surface. Using TESCAN VEGA TS5136XM scanning electron microscope plus EDAX GENESIS2000X-Ray to analyze energy spectrum. The results are shown in Table 3. The main elements on the inner wall surface of the thinned area are Fe and O, and the oxygen content is low, with an atomic mass ratio of about 4:1(Fe:O).


